


Building a deck can transform your outdoor living space, adding value, functionality, and aesthetic appeal to your home. When it comes to popular deck sizes, 12×20 deck plans are an incredibly versatile and frequently chosen option. This dimension strikes a perfect balance, offering ample space for entertaining, dining, or simply relaxing without overwhelming a typical backyard. Whether you envision a cozy corner for morning coffee or a vibrant hub for summer barbecues, a 12×20 deck provides the foundation for countless possibilities.
The appeal of 12×20 deck plans lies in their practical footprint and design flexibility. It’s large enough to accommodate various furniture arrangements – think a dining set, a lounge area, or even a small outdoor kitchen – yet manageable enough for many DIY enthusiasts to tackle with confidence. The right set of free deck building plans can empower you to bring your vision to life, saving significantly on labor costs while ensuring structural integrity and a beautiful finish. This comprehensive guide will delve into everything you need to know about designing, building, and making the most of your new 12×20 deck, ensuring a successful project from start to finish.
Why Choose 12×20 Deck Plans for Your Home?
Opting for 12×20 deck plans offers a strategic advantage for many homeowners. This particular size is renowned for its optimal balance of space and construction feasibility. On one hand, a 12×20 foot area, which translates to 240 square feet, is generous enough to carve out distinct zones for different activities. You could easily fit a comfortable seating arrangement for social gatherings alongside a dedicated dining area, making it perfect for entertaining guests or enjoying family meals outdoors. This spatial versatility is a significant draw, allowing for a multifaceted outdoor experience right in your backyard.
Beyond its expansive feel, the 12×20 dimension is also quite practical from a construction standpoint. It’s often considered a sweet spot for DIY builders, as it’s large enough to be genuinely useful but not so massive that it becomes overwhelmingly complex or expensive to build. Many free deck building plans are readily available for this size, providing detailed instructions, material lists, and cut diagrams that simplify the entire process. This accessibility means that with careful planning and a moderate level of carpentry skills, homeowners can achieve a professional-looking deck without incurring high professional labor costs. Furthermore, the standardized nature of 12×20 deck plans often translates to more efficient material acquisition, as lumber and decking boards are typically sold in lengths that minimize waste for this common dimension, ultimately contributing to a more budget-friendly project.
Maximizing Space with Intelligent Layouts
Even with ample space, smart layout is key. For 12×20 deck plans, consider dividing the space into functional zones. A common approach is to dedicate one end to dining, perhaps with a large outdoor table and chairs, and the other to lounging, featuring comfortable sofas, armchairs, and a coffee table. Strategic placement of planters, screens, or even low walls can help define these areas without making the deck feel cramped. Think about traffic flow: ensure there’s a clear path from your house to all areas of the deck, preventing bottlenecks during gatherings.
Cost-Effectiveness and Material Choices
When planning your 12×20 deck, material selection plays a crucial role in both aesthetics and budget. Pressure-treated lumber is a popular and cost-effective choice for structural components and often for the decking surface itself, offering good resistance to rot and insects. For a more premium look and reduced maintenance, consider composite decking, which comes in various colors and textures and resists fading, staining, and mold. While the upfront cost is higher, the long-term savings on maintenance can be substantial. Cedar and redwood are other attractive natural wood options, prized for their beauty and natural resistance to decay, though they generally require more regular sealing and staining. Remember to factor in the cost of fasteners, concrete for footings, railing systems, and any desired extras like lighting or built-in benches.
Essential Components of 12×20 Deck Plans
Understanding the fundamental components is critical before embarking on any deck construction, especially with well-structured 12×20 deck plans. A deck, regardless of its size, is more than just a flat surface; it’s a carefully engineered structure designed to withstand various environmental stresses and safely support its occupants and furnishings. At its core, every deck consists of several key elements:
- Footings: These are the foundational elements, usually concrete piers, that transfer the weight of the deck down to stable soil below the frost line. Properly sized and spaced footings are paramount for preventing the deck from shifting, settling, or heaving due to ground movement or frost.
- Posts: Vertical supports, typically made of pressure-treated lumber, extend from the footings to support the rest of the deck frame. They must be plumb, adequately braced, and securely attached to the footings and beams.
- Beams: Horizontal members that span between posts, carrying the load from the joists. Beams are crucial load-bearing components, and their size and spacing are determined by the deck’s dimensions and anticipated loads, as detailed in your 12×20 deck plans.
- Ledger Board (if attached to house): When a deck is attached to the house, a ledger board is bolted directly to the house’s rim joist. This connection is critical for structural integrity and must be properly flashed and sealed to prevent water intrusion into the house’s framing.
- Joists: These are the horizontal framing members that run perpendicular to the beams and support the decking boards. Joist spacing (typically 16 or 24 inches on center) affects the strength and rigidity of the deck surface.
- Decking Boards: The visible surface of the deck, typically made of wood or composite materials, that you walk on. These are fastened to the joists.
- Railing System: Comprises posts, top and bottom rails, and infill (balusters or pickets). Essential for safety, code compliance, and often a significant design element.
- Stairs: If your deck is elevated, stairs provide access. They consist of stringers, treads, and risers, and must also conform to safety standards regarding rise and run.
Each of these components plays a vital role in the overall stability, safety, and longevity of your 12×20 deck. Understanding their function and ensuring they are correctly installed according to your chosen free deck building plans and local building codes is absolutely essential for a successful and safe project.

Navigating Free Deck Building Plans and Permits
One of the most appealing aspects of tackling a deck project for many homeowners is the availability of free deck building plans. These resources can be incredibly valuable, offering detailed diagrams, material lists, and step-by-step instructions that can guide you through the construction process. Many reputable websites, lumber manufacturers, and even government agencies provide well-designed plans for various deck sizes, including popular 12×20 deck plans. When searching for free plans, look for those that are comprehensive, include cut lists, and ideally, have positive reviews or come from trusted sources. While these plans are a fantastic starting point, it’s crucial to remember that they are often generic and may not account for the specific nuances of your local building codes or site conditions.
This brings us to one of the most critical steps in any deck construction project: securing the necessary permits. Skipping this step can lead to significant problems down the line, including fines, forced demolition, or issues when selling your home. Building permits ensure that your deck meets local safety standards and structural requirements. The permitting process typically involves submitting your deck plans (which can often be adapted from your free deck building plans) to your local building department for review. They will check for compliance with local codes regarding things like footing depth, beam and joist sizing, railing height, and attachment methods. It’s wise to visit or call your local building department early in your planning phase to understand their specific requirements, as these can vary significantly by municipality. They can also advise on any inspections that will be required during construction. Always err on the side of caution and obtain the proper permits; it’s a small investment of time that provides peace of mind and ensures the safety and legality of your beautiful new 12×20 deck.
Adapting Plans to Your Specific Needs
While free deck building plans for a 12×20 deck are a great starting point, they rarely account for every unique aspect of your property or personal preferences. Consider how you might adapt the generic design. For instance, do you need specific access points from your house? Will your deck be built around an existing tree or landscape feature? Do you desire a particular type of railing, like glass panels or horizontal cables, which might require different framing? Take the time to sketch out your ideas and integrate them into the chosen plans. Remember to always prioritize structural integrity and safety; any modifications should not compromise these aspects. Consulting with a professional or referencing local building codes can help ensure your customized 12×20 deck plans remain sound.

Designing for Durability and Aesthetics with 12×20 Deck Plans
When bringing your 12×20 deck plans to life, it’s not just about erecting a structure; it’s about crafting an outdoor space that is both visually appealing and built to last. Durability and aesthetics go hand-in-hand, ensuring your investment stands the test of time while enhancing your home’s curb appeal and your enjoyment. The choices you make now, from materials to finishes, will significantly impact how your deck performs and looks for years to come.
For durability, the foundation is paramount. Ensure your footings are dug to the proper depth, below the frost line in your region, to prevent shifting and heaving. Using pressure-treated lumber for all substructure components (posts, beams, joists) is non-negotiable for resisting rot, decay, and insect infestation. Even if you opt for composite decking, the substructure must be robust. Proper fastener selection is also crucial; use corrosion-resistant screws or nails, especially for exterior applications, to prevent unsightly streaks and structural weakening over time. Regular maintenance, such as cleaning and sealing (for natural wood), further extends the life of your deck.
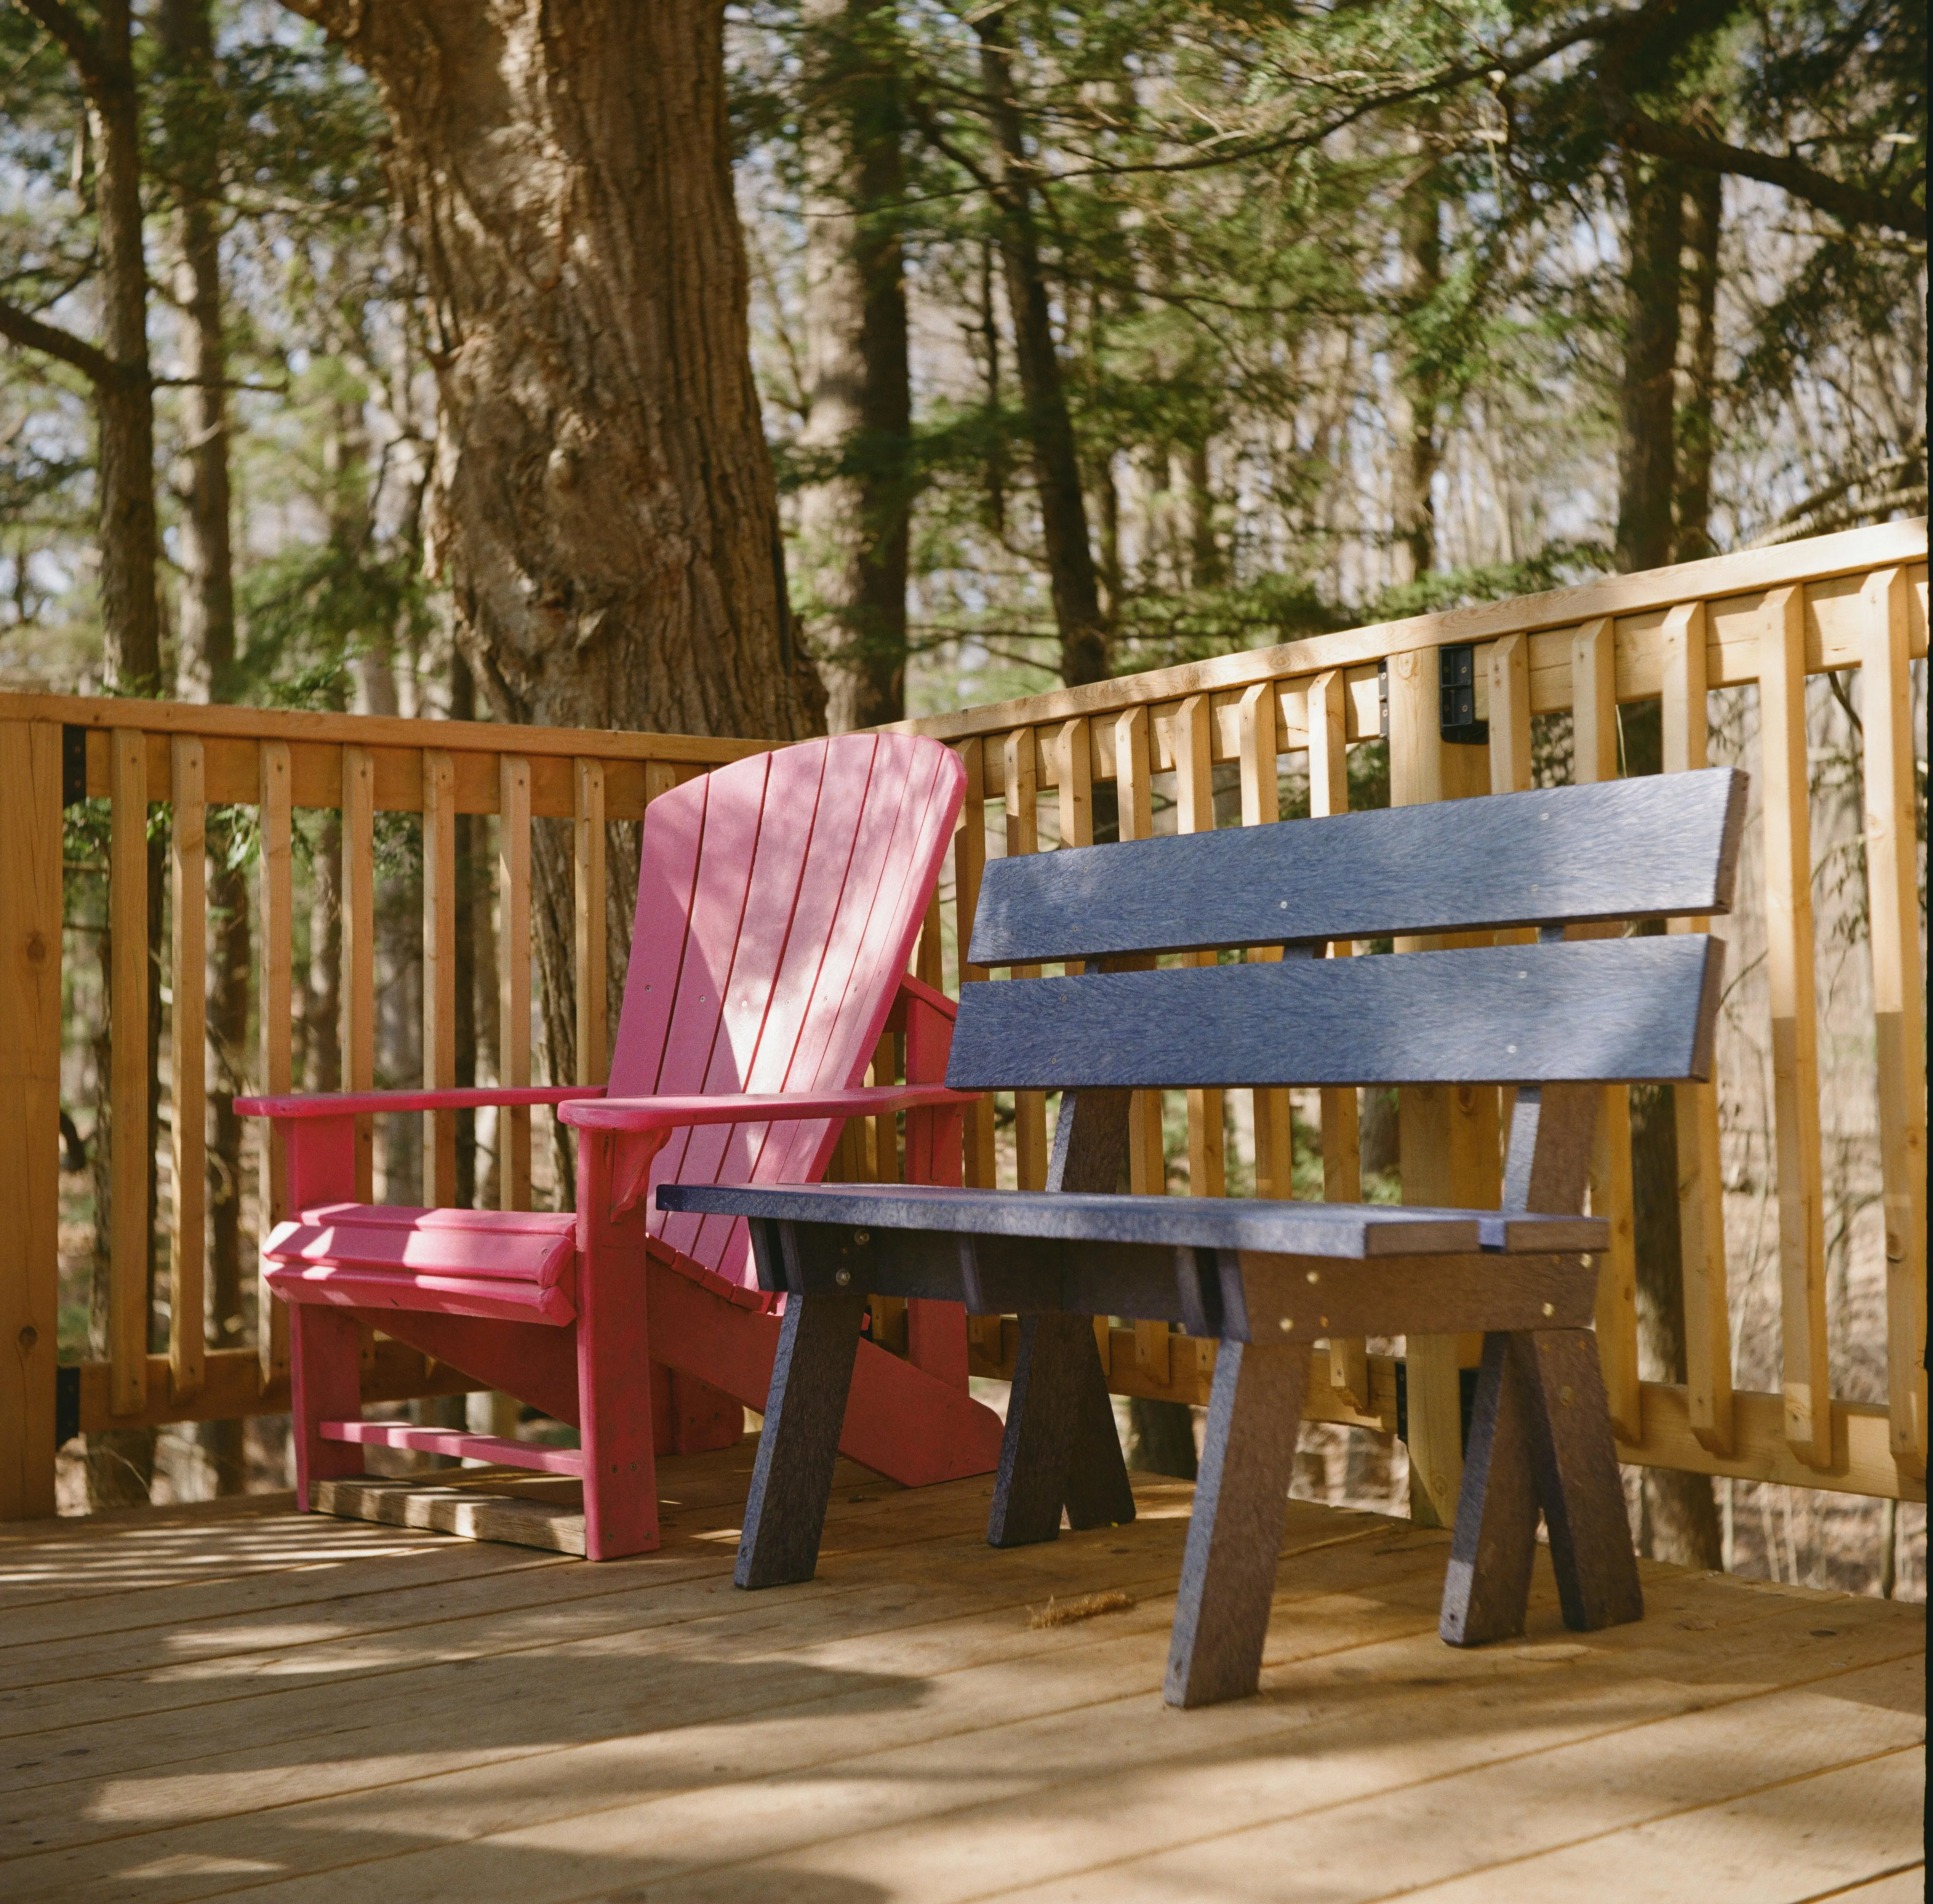
Aesthetically, your 12×20 deck plans offer a substantial canvas. Consider the direction of your decking boards – running them parallel to the house can make the deck appear longer, while running them perpendicular might make it feel wider. Diagonal patterns can create a unique, custom look but often involve more material waste and complex cuts. Railing design is another major aesthetic element; choose a style that complements your home’s architecture, whether it’s classic picket, modern horizontal, or virtually invisible glass. Incorporate built-in features like benches, planters, or even subtle lighting to add character and functionality. Don’t forget color – staining or painting a wood deck can dramatically alter its appearance, while composite decking offers a wide range of pre-finished colors and textures. By consciously integrating design choices with durable construction practices, your 12×20 deck will be a beautiful and resilient addition to your home for many seasons.
Decking Material Options and Longevity
Your choice of decking material heavily influences both longevity and appearance. Pressure-treated pine is economical and durable when properly maintained, but requires regular staining or sealing. Cedar and redwood offer natural beauty and insect resistance but are softer and also benefit from sealing. Composite decking, a blend of wood fibers and plastic, provides excellent durability, low maintenance, and comes in various colors, but can be more expensive upfront. Exotic hardwoods like ipe are incredibly dense and durable, offering unparalleled longevity and beauty, but they are expensive and challenging to work with. Weigh the initial cost against long-term maintenance and desired aesthetic when finalizing your 12×20 deck plans.
Adding Features for Enhanced Enjoyment
Beyond the basic structure, consider adding features that elevate comfort and usability. Built-in benches can offer convenient seating and eliminate the need for bulky furniture, freeing up valuable space on your 12×20 deck. Planters can integrate greenery, adding color and softening the edges of the deck. Outdoor lighting – from subtle post cap lights to string lights or recessed floor lighting – extends the usability of your deck into the evening hours and creates a wonderful ambiance. A pergola or retractable awning can provide much-needed shade on hot days, making your deck a more comfortable retreat. Think about how you’ll use your deck and what additions would make it truly your own.

Maintenance Tips for Your 12×20 Deck
Once your amazing 12×20 deck plans have been transformed into a stunning reality, the next crucial step is ensuring its longevity and maintaining its aesthetic appeal. Proper and regular maintenance is not just about keeping your deck looking good; it’s vital for preserving its structural integrity and safety. Neglecting maintenance can lead to premature wear, rot, splintering, and costly repairs down the line. Fortunately, most maintenance tasks are straightforward and can be easily incorporated into your seasonal home care routine.
For wooden decks, the cornerstone of maintenance is regular cleaning and sealing/staining. Annually, give your deck a thorough cleaning to remove dirt, mildew, and algae. A deck cleaner specifically designed for your wood type, combined with a stiff brush or a pressure washer (used carefully on a low setting to avoid damaging the wood fibers), can restore its fresh look. After cleaning and allowing the wood to dry completely, reapply a high-quality deck sealer or stain every 1-3 years, depending on the product and exposure to elements. This protective layer shields the wood from UV damage, moisture absorption, and helps prevent rot and insect infestation. Inspect for loose fasteners, protruding nails, or splinters, and address them promptly.
For composite or PVC decks, maintenance is generally simpler, but still necessary. These materials are highly resistant to rot and insects and don’t require sealing. However, they do need regular cleaning to prevent the buildup of dirt, grime, and mildew. A simple scrub with soap and water, or a specialized composite deck cleaner, is usually sufficient. Always refer to the manufacturer’s guidelines for recommended cleaning products and methods to avoid inadvertently damaging the surface. Regardless of material, always ensure proper drainage around and under your 12×20 deck to prevent moisture buildup, which can lead to issues with the substructure. Regularly clear debris from between boards and around posts. By dedicating a little time each year to these simple maintenance tasks, your 12×20 deck will remain a beautiful and safe outdoor oasis for many years to come.
Seasonal Deck Care Checklist
Implementing a seasonal maintenance checklist can help keep your deck in top shape. In spring, after the frost lifts, clean thoroughly, inspect for winter damage, and prepare for sealing/staining if needed. In summer, focus on minor spot cleaning and enjoying your deck! In fall, clear leaves and debris, especially from between boards and around joists, to prevent moisture retention. Before winter, ensure all furniture is stored or covered, and check for any potential water traps that could freeze and expand. This routine ensures your 12×20 deck remains resilient through all seasons.
Addressing Common Deck Problems
Even with good maintenance, some issues may arise. Splintering on wood decks often indicates a need for sanding and re-sealing. Mildew and algae are common but easily removed with appropriate deck cleaners. Sagging joists or wobbly railings are more serious and require immediate attention and potentially professional repair, as they indicate structural compromise. Keep an eye out for signs of insect infestation or rot, especially in areas with persistent moisture. Addressing these problems early can prevent them from escalating into major, expensive repairs, ensuring the safety and longevity of your 12×20 deck.
Building with 12×20 Deck Plans: Step-by-Step Overview
Embarking on the construction of your deck using 12×20 deck plans is an exciting endeavor that can be incredibly rewarding. While the process involves several detailed steps, breaking it down makes it manageable. This overview will guide you through the typical sequence of building a deck, emphasizing key considerations at each stage to ensure a sturdy, safe, and beautiful finished product.
- Planning and Permitting: As previously discussed, this is the crucial first step. Finalize your 12×20 deck plans, incorporating any customizations. Obtain all necessary building permits from your local authority. Understand and adhere to local building codes regarding setbacks, footing depth, structural sizing, and railing requirements.
- Layout and Footings: Once permits are in hand, the real work begins. Carefully lay out the exact dimensions of your 12×20 deck on the ground, using stakes and string lines. Mark the locations for all supporting posts and, consequently, the concrete footings. Dig the footing holes to the specified depth (below the frost line) and width. Pour concrete footings, ensuring they are level and incorporate post anchors or sono tubes as required by your plans and codes. Allow ample time for the concrete to cure.
- Post and Beam Installation: Install the vertical posts onto the cured footings, ensuring they are plumb and correctly aligned. Cut posts to the appropriate height, compensating for the beam and joist thickness to achieve your desired deck height. Attach the main support beams to the posts using approved connectors. If your deck is attached to the house, secure the ledger board to the house’s rim joist, ensuring proper flashing for moisture protection.
- Joist Framing: Install the deck joists perpendicular to the beams and ledger board. Space them according to your 12×20 deck plans (typically 12, 16, or 24 inches on center), using joist hangers for secure attachment to the ledger and beams where necessary. Ensure all joists are level and properly aligned.
- Decking Installation: Begin laying your chosen decking boards. Start with a board parallel to the house or a prominent edge, maintaining a consistent overhang. Use appropriate fasteners (deck screws or hidden fasteners) and maintain consistent spacing between boards for drainage and expansion/contraction. Stagger butt joints (where board ends meet) for a stronger and more aesthetic finish.
- Railing and Stairs: Install the railing posts securely, either bolted to the rim joist or through the decking into the framing below. Then attach the top and bottom rails and the infill (balusters, pickets, etc.) according to code. Construct and install the stairs, ensuring the rise and run of each step are consistent and meet code requirements for safety.
- Finishing Touches: Clean up the construction site. For wood decks, apply a protective stain or sealant. Install any additional features like built-in benches, lighting, or planters. Conduct a final inspection to ensure everything is secure, level, and meets all safety standards.
Remember that safety is paramount. Wear appropriate personal protective equipment, follow tool instructions, and never hesitate to consult a professional if you encounter challenges beyond your comfort level. With careful planning and adherence to your 12×20 deck plans, you’ll soon be enjoying your marvelous new outdoor living space.
FAQs About 12×20 Deck Plans
How much does it cost to build a 12×20 deck?
The cost to build a 12×20 deck can vary significantly based on material choices, labor costs, and your location. For a DIY project using pressure-treated lumber, you might expect to spend anywhere from $2,500 to $6,000 for materials alone. If you hire a contractor and opt for higher-end materials like composite decking, the total cost could range from $6,000 to $15,000 or more. Obtaining multiple quotes for materials and labor is recommended for an accurate estimate.
Do I need a permit for a 12×20 deck?
Yes, almost invariably. Most municipalities require a building permit for any deck construction, especially for elevated decks or those attached to the house. Permitting ensures your deck meets local safety and structural codes. Always check with your local building department before starting construction to understand their specific requirements and the application process.
What materials are best for a 12×20 deck?
The best materials depend on your budget, desired aesthetics, and maintenance preferences. Pressure-treated lumber is budget-friendly and durable but requires regular sealing. Cedar and redwood offer natural beauty with less rot resistance than treated wood but need sealing. Composite decking is low-maintenance, won’t rot or splinter, and comes in various colors, but has a higher upfront cost. Exotic hardwoods like ipe are extremely durable but very expensive.
How long does it take to build a 12×20 deck?
The construction time for a 12×20 deck varies based on your experience level, the complexity of the design, and whether you have help. For an experienced DIYer, it might take 2-4 weekends of dedicated work. If you’re a novice, plan for several weeks of part-time effort. A professional contractor can often complete the construction of a basic 12×20 deck in 3-7 days, depending on weather and crew size.
Can I find free deck building plans for a 12×20 deck online?
Yes, absolutely! Many resources offer free deck building plans for various sizes, including 12×20 decks. You can find them on websites of lumber manufacturers, home improvement stores, and DIY project sites. These plans often include material lists, cut diagrams, and step-by-step instructions. However, remember to verify that any free plans comply with your local building codes, as these can vary significantly.
Conclusion: Your Dream 12×20 Deck Awaits!
As we’ve explored, a well-planned and executed 12×20 deck plans project can profoundly enhance your home’s outdoor living experience. This popular size offers an ideal balance of functional space and construction feasibility, making it a fantastic choice for a wide array of activities, from intimate family gatherings to lively outdoor entertaining. From selecting the right materials for durability and aesthetics to navigating the essential permits and understanding the step-by-step building process, you now have a comprehensive understanding of what it takes to bring your vision to life. The availability of free deck building plans further empowers homeowners to tackle this project with confidence, knowing they have a solid foundation to work from.
Remember, the success of your 12×20 deck largely hinges on meticulous planning, adherence to local building codes, and a commitment to quality craftsmanship. Don’t rush through the permitting process, invest in good quality materials where it counts, and always prioritize safety during construction. Once complete, consistent maintenance will ensure your deck remains a beautiful, safe, and valuable extension of your home for many years to come. So, take the leap, embrace the challenge, and soon you’ll be enjoying countless memorable moments on your amazing new 12×20 deck. Start planning today!